domingo, 22 de mayo de 2011

VESTIDO CON FLORES DE TELA


Aqui está una de las cosas que he hecho con las flores de tela del post pasado. Las he cosido a un vestido  de niña, con las demás he hecho unas diademas que os enseñaré pronto.

This is one of the things I´ve made with the flowers in the last post. I have sewn them in a child dress, with the other ones I have made some head bands. I will show them soon.


domingo, 15 de mayo de 2011

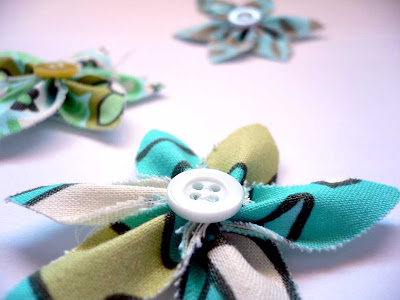
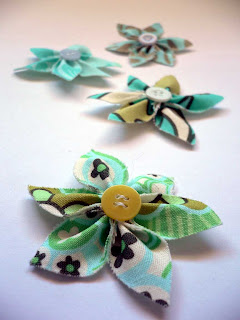
FLORES DE TELA


Estas flores están hechas igual que en el post de como hacer una flor de fieltro, pero usando tela. Quedan mejor si ponéis una entretela adhesiva por abajo, de esa manera no se deshilachan y quedan más rígidas. Todavía no estoy muy segura de en que las voy a utilizar, aunque tengo varias ideas. En cuanto me decida os subo el resultado. ¡Feliz domingo!

These flowers are made the same way than the ones in the post about making a felt flower, but using fabric instead. They will look better if you place fused interlining in the back, that way they will be stiff. I´m not sure in what I´m gonna use them yet, but I´ve got some ideas in mind. I will post them as soon as I make up my mind. Happy sunday! 


sábado, 7 de mayo de 2011

DIADEMAS DE CAMISETAS RECICLADAS


Estas diademas las he hecho reciclando camisetas, ya que ultimamente veo muchas cosas por la web hechas con esta técnica, asi que no he podido resistirme a probar. Para hacer la flor amarilla teneis un tutorial en el blog Matsutake. Abajo podeis ver como he cortado la camiseta para conseguir una madeja de tejido , es muy fácil y también se puede hacer con telas usadas.

I made these hairbands recycling some old T-shirts, I saw a lot of stuff made by this technique in the web lately, so I couldn´t resist to make one. You have a tutorial to make the yellow flower at Matsutake blog. Below you can see how I cuted the T-shirt to get the yarn, it´s very easy and you can also do it with old fabrics.


Primero se corta el borde final de la camiseta y se va cortando en tiras de un extremo a otro  pero sin llegar hasta el final. Luego se abre por el lado donde las tiras han quedado unidas y se corta como veis en la foto del centro, en diagonal, de esta manera queda un hilo continuo, se estira y se hace una madeja. Después solo queda usar la imaginación... Yo he hecho una flor de ganchillo a base de cadenetas con un boton en el centro.

Fist of all you have to cut the end of the T-shirt and then you just cut it into strips from one side to another but without reaching the edge. After opening on the side where the strips have been bound you cut them in diagonal lines as you see in the photo , so it will came out a continuous thread, you strech it and becomes a ball. then you just have to use you imagination.I have made a crochet flower with a button in the center.

lunes, 2 de mayo de 2011

¿PONCHO, FOULARD O CHALECO?


Quería hacer un poncho pero no encontraba ningún patrón que me terminara de gustar, ya que los que me gustaban no me encajaban en el tipo de lana que había comprado, así que me fijé en uno que compré hace tiempo y vi que simplemente eran dos rectángulos iguales cosidos de forma perpendicular. Se me ocurrió que si en vez de coserlos le ponía botones, había muchas más posibilidades de unirlos de diferentes formas, y este es el resultado.
Para hacerlo sólo necesitáis tejer dos rectángulos exactamente iguales y coser unos botones en un extremo de cada rectángulo. Yo los hice de 40 x 75 cm. pero os recomiendo que hagáis primero una patrón de papel, para ver que medida necesitáis.

I wanted to make a poncho but I didn´t found any pattern that would fit in the kind of wool I bought, so I took one I bought long time ago to see how it was made, and I realized it was made out of two rectangles sewn in a perpendicular way. I thought that instead of sewing them I should just sew some buttons and put them together in many diferent ways. So here is the result.
You just need to make two rectangles and sew some buttons in one of the edges of each one. I made them in 40 x 75 cm., but I recomend you to do  a paper pattern first, to see if that is the right size you need.


El de arriba son los dos rectángulos unidos en el extremo y se puede usar como un chal, teniendo además la posibilidad de sujetarlo por delante con los botones.
Abajo, el poncho, se ponen los dos rectangulos formando una "L" y se abrochan los botones del extremo de uno en el lado largo del otro, y en el otro lado se hace lo mismo.

The one above is made with the two rectangles joined in the end, and you can use it as a shawl.
Below, the poncho, putting the two rectangles together making a "L", and buttoning the short edge of one with the large side of the other. and doing the same thing in the other side. 


El foulard son otra vez los dos rectángulos unidos en el extremo ( como en el chal ). Y el chaleco de abajo, se consigue desabrochando dos de los botones, para meter la cabeza, y luego queda abierto por los lados, pero con un cinturón se mantendrá en su sitio.

The "foulard" is again the two rectangles joind at the end (as the shawl). And the vest below is as the foulard but leaving two buttons open, to get the head throw, and then it will be open in the sides, but with a belt you will keep it on place.


Related Posts Plugin for WordPress, Blogger...